DIY Pies
Summer isn't even here yet, but already the summer of 2014 is shaping up to be the Summer of the Pizza. You see, a few weeks ago I experienced something of a pizza epiphany (the trigger appeared in The New York Times, so I'm pretty sure I wasn't alone), and since then I've been on a tear.
 fig. a: Tony's Pizza!
I'd been messing around with pizza recipes for a few years, and I'd experienced a fair degree of success, but I'd never quite hit on a recipe that felt like The One. Most of the time I was working with variations on Chad Robertson's pizza basics from Tartine Bread. I've been baking bread quite seriously for a few years now, and my method is very closely based on Robertson's method, so it made sense to follow his lead when it came to pizza, too. If you follow the instructions in Tartine Bread, the pizza that results is a sourdough-based pie that's a bit on the rustic side for three reasons: 1) because you're essentially pinching dough from your country bread recipe, which contains 10% whole wheat flour, 90% all-purpose flour, and no 00 flour; 2) because your sourdough starter also contains whole wheat flour; and 3) because Robertson recommends dusting your pizza peel with corn meal to help with the transfer of the pizza to your stone. I like "rustic," and Robertson's method results in pizzas that have nice shape and great rise to them, but, still, even though I played around with the formula, it never felt like The One.
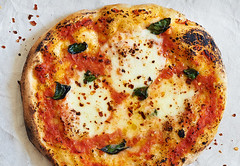 fig. b: margherita by Falco & Sifton
Then I came across Sam Sifton's collaboration with Anthony Falco in the digital pages of The New York Times back in April. Sifton wasn't just looking to create good pizza at home, he was aspiring to greatness. And in order to crack the code, he turned to Falco, the "official pizza czar" at Roberta's, the pizzeria/restaurant/bar/tiki garden/community radio station that's perhaps the defining enterprise and hangout of the Bushwick scene of the last decade. Roberta's also happens to produce some truly outstanding pizza pies. What resulted was a manifesto. After commenting on the sheer amount of pizza consumed in America, then lamenting the fact that so much of that pizza is so poor, Sifton goes ahead and proclaims the arrival of a New Era of DIY Pizza-Making:
Very little pizza is made at home, from scratch.
I am here to change that. I am here to say: You can make pizza at home. You can make pizza at home that will be the equal of some of the best pizzas available on the planet. With a minimal amount of planning and practice, you can get good at it, even if you are a relatively novice cook. [my emphasis]That's a bold statement worthy of the bold type, but, the thing is, Sifton is just about right. You can make pizza at home. You can even make some mighty fine pizzas that are comparable to some of the best pizzas available on the planet. The only thing you'll likely be missing out on is the effect of baking a pizza fast in a blistering-hot pizza oven that's running somewhere between 700º - 1000º F, especially a wood-fired pizza oven like Roberta's. But your pizzas will look awesome and you'll be proud to serve them, and, even more importantly, you'll be blown away by just how great your DIY pies taste. I mean, even your leftover pizza will look and taste great.
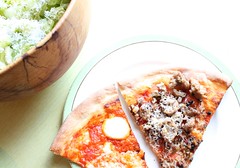 fig. c: leftover margherita & sausage pizza lunch
As soon as I tried this Roberta's Pizza Dough recipe, it felt like The One.
The secret to the Roberta's recipe is all in the method. Aside from the 00 flour, the ingredients are as basic as they get. Sifton urges his readers to make use of a kitchen scale the way real bakers do. I fully agree, but I've included the volume for the active dry yeast because the amount called for (2 grams) is very small, and my kitchen scale is not particularly trustworthy when it comes to such tiny amounts. And although the recipe works with a minimum of 3 hours' rising time, it works like a charm and has a great deal more flavour if you start your dough about 24 hours before you plan to make your pizzas. I've made a few 3-hour, 6-hour, and 8-hour pizzas using this recipe over the last couple of months, but I always get the very best results when I start 20 to 24 hours in advance. Plan ahead. What Sifton calls "a little pizza homework" really pays off.
Another one of the reasons that Sifton and Falco's collaboration is such a success, is that the article comes with an accompanying video that's clear and concise and provides a great sense of what the dough should look and feel like at each stage in the process. Don't miss out on it!
The only specialized pieces of equipment you need to make great pizzas at home are a pizza/baking stone and a pizza peel, but even these aren't 100% essential, and Sifton & Falco suggest some useful cheats.
Anyway, without any further ado:
Roberta's Pizza Dough
Total time: 20 minutes, plus at least 3 hours of rising time
Ingredients:
153 grams 00 flour
153 grams all-purpose flour
8 grams fine sea salt
2 grams active dry yeast (3/4 teaspoon)
4 grams extra-virgin olive oil
Preparation:
1. In a large mixing bowl, combine flours and salt.
2. In a small mixing bowl, stir together 200 grams lukewarm tap water, the yeast and the olive oil, then pour it into flour mixture. Knead with your hands until well combined, approximately 3 minutes, then let the mixture rest for 15 minutes.
3. Knead rested dough for 3 minutes. Cut into 2 equal pieces and shape each into a ball. Place on a heavily floured surface, cover with dampened cloth, and let rest and rise for 3 to 4 hours at room temperature or for 8 to 24 hours in the refrigerator. (If you refrigerate the dough, remove it 30 to 45 minutes before you begin to shape it for pizza.)
4. Place your baking stone on the middle rack of your oven and preheat your oven at the very highest setting.
5. To make pizza, place each dough ball on a heavily floured surface and use your fingers to stretch it, then your hands to shape it into rounds or squares. Top and bake.
6. Check your pizza after about 3-4 minutes. Rotate your pizza if necessary. Total baking time will be approximately 4 to 8 minutes, depending on the nature of your oven.
Yield: 2 x 12-inch pizzas
[recipe based very closely on the recipe that appears in "A Little Pizza Homework" by Sam Sifton, The New York Times, April 8, 2014]
Topping a pizza is tender work as well. You do not want to overload the pie. Doing so leaves it soggy, no matter the heat of the oven.He's absolutely right, and the recipes that accompany his article are all minimalist gems from the Roberta's repertoire: their margherita; a two-cheese pizza that cleverly riffs on cacio e pepe, the classic Roman pasta dish (think lots of pepper); and the Green & White, which combines a simple mozzarella pizza with fresh greens.
But after you've mastered these, you'll likely feel emboldened and start thinking about experimenting with toppings a little. This recipe is very amenable to such experimentation. Just remember to keep it simple when you do.
When I got started on this pizza craze back in April, I started out as simple as they get--mostly margheritas and marinaras. But as soon as I felt I had the hang of this recipe (and that was pretty much immediately), I tried out some more adventurous combinations that I'd collected over the years--combinations that I'd either experienced firsthand, or that I'd read about. Like this radicchio & gremolata pizza
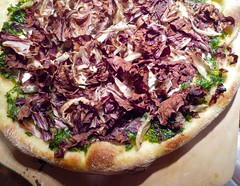 fig. d: radicchio & gremolata pie
that I also read about in The New York Times a few years back.
Or this potato pizza recipe
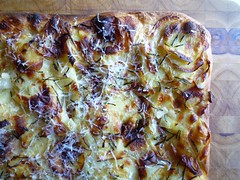 fig. e: potato pie
from Jim "No-knead/Sullivan Street Bakery" Lahey that's been blowing our minds for years.
Or even this breakfast pizza
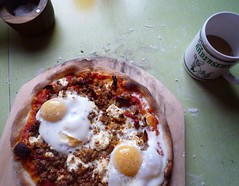 fig. f: sausage & egg breakfast pie
that combined a riff on American Flatbread's classic New Vermont Sausage pizza with an homage to Motorino's breakfast/brunch pizzas.
Feeling lucky? Here's the recipe for the radicchio pie:
Radicchio & Gremolata Pizza
1/2 bunch parsley, roughly chopped
1 clove garlic, minced
zest of 2 lemons
zest of 1 orange
extra-virgin olive oil
salt & freshly ground black pepper
1 head radicchio, cored, outer leaves discarded, cut into 1/4-inch strips
4 oz mozzarella
1 oz grated Parmesan or aged pecorino
Mix the parsley, garlic, citrus zests and enough olive oil to make a loose paste. Add the salt and the black pepper until the flavour is strong and pleasant to the palate. Let the gremolata sit for at least 30 minutes, or up to two hours.
Once you've formed your pizza dough, spread half the gremolata on it, before topping it with half the mozzarella and half the Parmesan or pecorino, and, finally, half the radicchio. This amount of radicchio might look excessive, but, don't worry, it will reduce significantly.
Bake until the crust is golden and the radicchio is wilted and a bit charred.
Eat and repeat.
Yield: makes enough topping for 2 x 12-inch pizzas.
[based on a recipe that accompanied "The Slow Route to Homemade Pizza" by Oliver Strand, The New York Times, May 18, 2010]This beautiful pizza may very well have been the winner at a recent pizza party featuring four different types. It looks amazing and the taste is unbelievable. The radicchio gets a bit charred and crispy and caramelized on top; then there's a second layer of radicchio that gets sweet and juicy; and, finally, there's the cheese and the gremolata to bring it all together and really make it sing. We're talking a serious showstopper here.
Anyway, that Roberta's Pizza Dough recipe is the key. Especially if you give it the time it needs to ferment properly. I've never seen a pizza dough that's such a joy to work with. And the flavour!
Stay tuned for more about potato pizza, and for my sourdough version of Roberta's Pizza Dough (!).
In the meantime:
Long live pizza!
&
Long live the New Era of DIY Pies!!
aj
