On the Road 8: VA & NC, Pt. 2
In our last instalment of On the Road, we began in the Ham Belt and quickly made our into an overlapping, but not entirely identical, region known as the Barbecue Belt. As we headed east, we soon entered one of the most famous parts of the Peanut Belt.
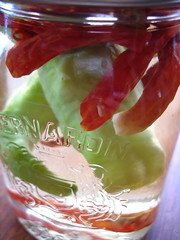
Peanuts
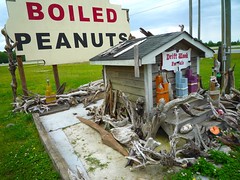 fig. a: peanuts & driftwood
In fact, at Mackey's Ferry Peanuts in Jamesville, NC, I found a little slice of peanut heaven positioned adjacent to a pretty nifty collection of driftwood. I was on the lookout for peanuts--real ones: jumbo, expertly roasted, and grown-in-the-USA--and that BOILED PEANUTS sign definitely caught my eye. I quickly made a U-turn and found everything I was looking for inside: salted roasted peanuts, unsalted roasted peanuts, peanut butter, peanut brittle, and boiled peanuts. Actually, in spite of that eye-catching sign, I wasn't sure that I was looking for boiled peanuts until I asked the counterperson for a sample. It almost sounds shameful, but I'd never, ever had boiled peanuts until that moment. When she came back out with a Dixie cup's worth of piping hot peanuts I was pretty excited. Then I tried one. "Hmm, I like that. Those are good," I told her, but I wasn't immediately bowled over, so I continued to take a look around the store. After about a minute, though, I realized I was doing so distractedly. Those boiled peanuts had gotten to me. They were sneaky like that. I had boiled peanuts on the brain.
What, exactly, is a boiled peanut? Well, it's just a raw peanut that's been boiled in salted water. You can make them with fresh, green peanuts during the mid-summer harvest, but typically they're made with peanuts that are unroasted, but that have been sun-dried. And if you've never had the pleasure, the taste sensation is something akin to having edamame in a Japanese restaurant. In fact, as the Lee Bros. recount in their Lee Bros. Southern Cookbook, a friend of theirs once approached with the idea of marketing boiled peanuts as "redneck edamame." They're both served hot and steamy, they're both salty, and they're both highly addictive and great as a snack food, and having them boiled really emphasizes the fact that peanuts are legumes and not "nuts."
Anyway, after a couple of minutes, I realized those boiled peanuts were much better than just "good"--they were "great" and that I was already hooked. I ordered a small portion, and I received a sizeable ziplock bag stuffed full of them. They arrived hot and steamy--straight out of the cauldron.
Now I just needed a place to sit and enjoy them, preferably with a beer. They tasted pretty amazing right there in the car, but I was pretty sure I could find a more scenic location to enjoy the rest of them. Which is where the Outer Banks came in handy.
 fig. b: under the rainbow
Those boiled peanuts were still hot by the time I'd set up my campsite, and the light and the temperature were just perfect for my beer and peanuts appetizer.
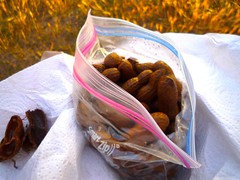 fig. c: boiled peanut appetizer
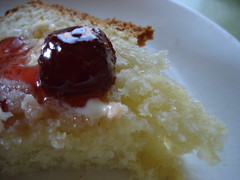
Little Layer Cakes
Across parts of the South, you find a number of areas where the ages-old tradition of little layer cakes--lovely homemade layer cakes that are notable for the thinness of their layers and the number of layers involved (usually 12 or more)--still runs strong. It's a region known as the Little Layer Cake Archipelago, and it extends at least as far south as Alabama, but some of its most famous islands of activity--perhaps even the most famous--can be found in an area that stretches from coastal North Carolina, up into the Eastern Shore of both Maryland and Virginia, including the Chesapeake Bay islands. I don't think there's any question that Smith Island Cake, which became the Official Dessert of the State of Maryland in 2008, is the most widely known variation on the little layer cake, and one of the most beloved. But, like I said, you can find little layer cakes throughout coastal North Carolina and Virginia.
 fig. d: layer cakes & biscuits
In fact, you can even find them in gas station concessions in North Carolina--like Cindy's Kitchen & Katering in Barco, NC--alongside homemade country ham & egg biscuits. They're right there on the shelf, freshly made, ready to take home with you (or to some friends of yours in New York), for $19.95 (!).* Don't even hesitate. There aren't tons of bakeries in the region that make little layer cakes--the field is dominated by expert home cooks--but those that do often make you order them well in advance.
Oysters
All through coastal North Carolina and Virginia you also find a whole lot of good seafood, including blue crabs, shrimp, fish, and oysters. There are signs of it everywhere.
 fig. e: signs of life
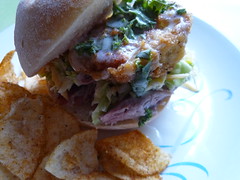
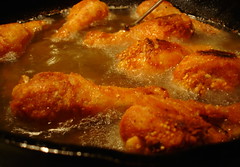
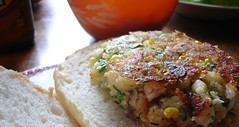
And when you see makeshift signs like these announcing a seafood shack, it pays to make a pit stop. What you're likely to find are fried fish platters and fried sandwiches of all kinds, sometimes even cooked to order. Like this freshly fried Chesapeake oyster sandwich, topped with tartar sauce and smothered in hot sauce.
 fig. f: fried oyster sandwich
Here, the seafood shack in question was a ramshackle two-man husband & wife affair that consisted of a storefront (wife) and a tiny fry kitchen (husband). The place was a real hotspot for the local blue-collar lunch crowd, and the Southern charm was in full effect. In fact, the accents and the storefront banter were just as delicious as the sandwich.
Home
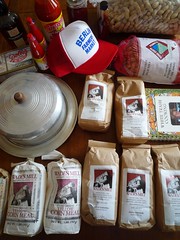 fig. g: the haul
When I arrived back in Montreal, I arrived bearing trophies and gifts, most of them edible.
Not surprisingly, I've been cooking a lot of Southern food since I returned home. My Southern sojourn only served to whet my appetite for Southern fare, and, plus, I came back with all kinds of useful ingredients. So I've been making a lot of barbecue, and cornbread, and grits, and I've been eating a lot of peanuts.
Last week I had a hankering for a fresh fried oyster sandwich, so I went ahead and made some.
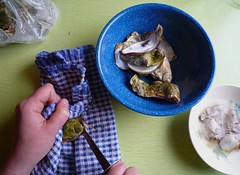 fig. h: shucking
There are parts of the South where freshly harvested pre-shucked oysters are commonplace. Here, in the North, you pretty much have to shuck your own, and our oysters are delicious, but they're not exactly inexpensive. Even oysters at wholesale prices cost a pretty penny. So it's a little cost-prohibitive to make an oyster sandwich as plentiful as you'd find in the South, but it sure tastes great, and you can make it to your specifications.
My fried oyster sandwiches were based on the recipe you find in the Lee Bros. Southern Cookbook, and once Michelle had shucked our oysters, they were cooked up and assembled in a flash.
 fig. i: assembly required
Fried Oyster No' Boys
a bare minimum of 12 plump, freshly-shucked oysters**
1/2 cup All-Purpose Fry Dredge (recipe follows)
2-3 cups peanut oil or canola oil for frying
Spicy Tartar Sauce (recipe follows)
Bibb lettuce
fresh avocado slices
2 Portuguese buns hot sauce
Pour the oil in a cast-iron skillet to a depth of about 1/2 inch. Heat over medium-high to high heat until a thermometer reads 365º F.
Scatter the dredge on a plate and gently toss the oysters in the dredge. When your oil has reached temperature, carefully transfer the oysters into the oil, making sure not to splatter the oil, and turn down the temperature to medium. Agitate the oysters in the oil gently until they're golden brown, about 30 to 45 seconds.
Transfer the oysters to a plate lined with paper towel (double thick).
Assemble your sandwiches, dividing the oysters between the sandwiches evenly. Devour.
[makes two sandwiches]
Lee Bros. All-Purpose Dredge
1/2 cup all-purpose flour
3 tbsp stone-ground cornmeal
2 tsp salt
1 1/2 tsp freshly ground black pepper
a sprinkling of bread crumbs for quick browning, if you're dredging fish or oysters (which you are)
Mix thoroughly. Keep in a jar.
Spicy Tartar Sauce
1/2 cup Pickled Corn (or Chowchow, or Jerusalem Artichoke Relish)
1/2 cup high-quality store-bought mayonnaise
1/2 tbsp chipotle purée
1 scallion, diced
Mix together. Adjust seasoning, if necessary.The fried oyster sandwich--sometimes called a fried oyster po' boy, and here designated the Fried Oyster No' Boy to indicate that this sandwich was a) made in the North, where oysters are b) rarely the food of po' folks--is one of the great classics of sandwichery.
We've got the oysters. Don't you owe it to yourself?
aj
* If math isn't your strong suit, that works out to about $1.66 a layer.
** Again, if you're not that strong in mathematics, that works out to about 6 oysters per sandwich. 12 would be ideal, but six plump oysters will do, again, as a bare minimum. It definitely won't take long to fry them--you can do them all in one batch.


