
Without question the most satisfying dinner I’ve prepared in some time, and also one of the most basic. And most of the credit, as you’ll see, goes to Elena.
As we reported last November, we've been in the habit of making the occasional batch of homemade pasta around AEB HQ for a couple of years now, ever since Michelle managed to bring a real Italian pasta machine—an Atlas—into the family. And for the most part these pasta-making sessions have resulted in some pretty tasty meals—and sometimes some extraordinary ones—but as we indicated, we’d continued to be restless when it came to our pasta dough recipe, not entirely convinced that we’d found the recipe we were looking for, the one that would become ours. Until now, that is.
Those of you who’ve been reading “…an endless banquet” for a while are probably quite familiar with our devotion to Quincaillerie Dante, which developed from a local Little Italy hardware store into the kitchen supply store/hunting specialist institution that it is today (50 years strong!). Not only is Quincaillerie Dante of the city’s most unique stores (although, really, since Pecker Bros. shut down there hasn’t been too much competition in that department), not only is it easily one of the city’s best kitchen supply stores, but it’s the store that serves as our touchstone, our source of inspiration, every year when it comes time to make our annual batch of tomato sauce, and for that we’ll always be grateful. But something you might not know about Quincaillerie Dante is that since 1993 its owner, the irrepressible Elena Faita, has run a cooking school in an apartment next door that’s been fully rigged with a massive Viking gas range, a large kitchen island, and a long table for 20. Take your pick from options such as pâtes maison, pâtes farcies 1-2-3, sauces 1-2, pizza and focaccia, risotto, polenta, saucisses, poulet, and cailles et lapin, and you’ll get a class, a multi-course meal (an exceptional one), and wine for $50. And if Italian cuisine just ain’t your bag, Elena also features cooking courses by Martin Picard (!), of Au Pied de Cochon—such as cassoulet, chevreuil, foie gras, foie gras and wine—and Mostafa Rougaïbi, of La Colombe—such as couscous, tagine, and chocolate 1-2-3.
Italian cuisine is very much “our bag” (part of it, anyway), so we’d been meaning to take one of Elena’s classes for years now, but for some reason we’d never just gone ahead and taken the plunge. Some of the reason for this had to do with the fact that we don’t really consider ourselves cooking class types—not that we don’t see the merit, not that we think we’re above that kind of thing, it’s just that we’re not the “types” (whatever that means). But, we were both agreed that what our novice pasta-making needed was just a little bit of guidance and a greater sense of “touch,” so in this case it made perfect sense—then we started thinking about the meal that awaited us, plus all the other breathtaking meals that would come out of this experience, and it made more than perfect sense. So we took the plunge.
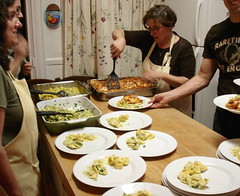
Our first class (because, believe me, there will be others) was pâtes maison. We were pretty sure this class would be kind of basic for us, but that’s we wanted: the basics, the foundation, the touch. And that’s what we got. We made three different types of pasta that night—pappardelle, spaghettini, and orecchiette—two with an egg and semolina-based mix, the third, the orechiette, with no eggs. Elena then showed us how to make three different sauces to accompany them—a spinach, mixed herbs, and ricotta sauce for the pappardelle, a rosé sauce for the spaghettini, and a spicy anchovy, oil-packed pepperoncini, and broccoli sauce for the orecchiette. The class lasted about three hours, maybe even more, and although mostly Elena walked us through all the procedures so that she could keep things at such a pace that we’d actually eat eventually, the making of the orechiette was very hands-on, so we could get a sense of the feel of the pasta and could learn the gesture necessary to get their unique “ear”-like shape. By the time it came to eat, we were famished, not so much because we were eating late—we tend to eat late anyway—more because watching Elena work, smelling the dishes she’d been preparing before us, and just talking about food as intensively as we’d been doing was enough to drive even St. Jerome himself wild.
Anyway, speaking of wild, we haven’t been the same since our class at Mezza-Luna. We’ve made fresh pasta twice in the ten days since our class and would have made some a third time if the folks we were intending to school ourselves hadn’t backed out. The most recent time it was my turn to go it alone. And this was the very first time I’d ever made pasta. Ever. “And?” No problem. They turned out great. There were a couple of things that I found liberating that night at Mezza-Luna with Elena, and these revelations certainly made things easier. For one thing, she emphasized that you only get the true taste of past from hand-rolled pasta, which is why the fresh pasta that people buy in stores is generally so disappointing: it’s not rolled, it’s pressed in just the same way you might have pressed Play-Doh through that Hasbro "pasta machine" back when you were a kid (hence the unfortunate textural similarities). For another, when you take into account that the cooking time for fresh pasta is extremely short (“20 seconds,” Elena kept telling us, although I think she was just trying to make the point that it’s very quick, certainly under a minute) and you combine that with the fact that the cooking time for fresh pasta is more or less identical regardless of the cut, it means that you don’t have to stress over your hand-cut pappardelle being absolutely identical, you can cut with relative abandon and still wind up with pasta that’s perfectly and uniformly al dente. That’s what I did (as you can see from the picture above), so I accompanied them with a simple red sauce (composed of a reduced version of our homemade, extra-garlicky tomato sauce that I’d added red wine to) with lots of freshly grated Parmesan. Simple, but beautiful.
You’ll notice that the recipe that follows seems rather convoluted. Isn’t that always the way things are when trying to describe something so elemental? If you’re confused, if you want to learn Elena’s sauces simultaneously, if you want to get a sense of the touch necessary, and if you can afford it, by all means, take one of Elena’s classes. Yeah, it costs a bit more than watching the Food Network, but that feel, those smells, and, most of all, those tastes come with a price.
Basic pasta recipe
3 cups semolina
4 extra-large eggs
2 tbsp olive oil + a little additional oil
4 tbsp water
Make a ring with the semolina flour on your countertop. Crack your eggs into the center of the ring. Using one hand, beat the eggs with your fingers so that they’re thoroughly mixed. Add the 2 tablespoons of olive oil and the water to the egg mixture. Mix well. Begin to make the dough by pulling some of the flour from the ring into the center, mixing it with the egg-oil-water mixture, using a circular mixing motion all the while. Mixing then kneading, use only the flour you need (although 3 cups of semolina flour has worked like a charm for us so far) to create a ball of dough that has sufficient elasticity and handles well, but no longer sticks to the counter surface. When the dough feels right, form it into a ball and drizzle it with a tiny bit of olive oil, just enough to coat the ball lightly. Then cover it with some plastic wrap and let it rest at room temperature for 20 minutes.
When the dough has rested, unwrap it and take it to the surface you intend to use to roll it out on. Pour out a bit of semolina flour in a pile on your surface. Cut your ball of dough into six roughly equivalent pieces. Take one of these pieces, sprinkle a bit of flour on it, knead it and flatten it into an oblong shape that’s about 1/4” thick, sprinkle the side that’s facing up with a bit more flour, fold it in two, and repeat this process two more times, folding the piece as needed to get it as rectangular as possible so that it’ll eventually fit through the pasta machine with ease. Now this piece is ready to roll out in a pasta machine. Set the machine to the “1” setting and roll the piece through. Sprinkle the piece that results with flour, fold in two, and repeat 2 more times. Sprinkle the piece with a bit more flour, set the machine to the “2” setting and roll the dough through, cranking the machine quickly and steadily. Sprinkle the elongated piece of dough that results with a bit more flour, se the machine to the “3” setting and roll the dough through in the same way. Repeat at least two more times, changing the setting of the pasta machine one notch as you go and finishing after you’ve passed the dough through either the “5” setting (for a slightly more rustic noodle) or the “6” setting (for a rather thinner, more refined noodle).
Take this long sheet of pasta, cut it into about 3 or 4 equal lengths and put it out on a rack or a towel to dry slightly. Meanwhile, roll out another sheet of pasta according to the steps above. When you’ve made sheet #2, go back to sheet #1 and slice it by hand into long thin pappardelle strips, about 1/4” – 1/3” in width. Repeat all these steps until the six pieces of dough you began with have been turned into a whole heap of pappardelle noodles.
This amount will feed 4 people with pasta as a main (in the North American way), or 6-8 as a first course (in the Italian way).
Variation: for a true pasta all'uovo use four egg yolks and no egg whites instead of the two eggs with egg whites.
The recipe above makes a really manageable dough, one that we’ve both found very easy to use and that’s produced fantastic results, but beginners should be prepared for these steps to take a bit of time. Not too long, though, because it’s a good recipe. With time, trust me, these steps will fly by. Elena’s been making pasta using this recipe for 45 years or so—you can imagine how effortless she makes it look. After just a couple “practice sessions” at home our confidence is to the point that we’re even thinking of starting to make fresh noodles when we make chicken soup and the like. And, who knows, maybe 45 years down the line (when we’re worthy) we’ll be teaching
pâtes maison classes ourselves.
Mezza-Luna, 57 Dante, 272-5299 (Little Italy)
email: sfaita@sympatico
aj
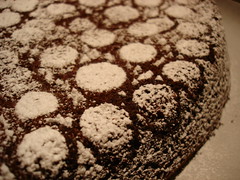 fig. a: torta alla caprese
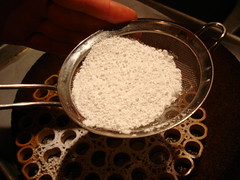 fig. b: giving the torta a right dusting


