Showing posts with label potatoes. Show all posts

Monday, June 30, 2014

Pizza Picnic

Once you've got the hang of that Roberta's Pizza Dough recipe, it can free you up to do all kinds of things.  In fact, your confidence might be such that you find yourself visiting your local restaurant supply store to pick up pizza boxes.  I mean, don't those beautiful almost-pro pies of yours deserve it?
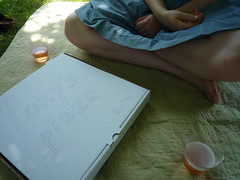
tony's pizza:  zuke! fig. a:  Tony's Pizza:  We deliver!

The Roberta's Pizza Dough recipe is intended to make classic, round Neapolitan pies that are cooked fast in a blistering-hot oven.  But it can just as easily be used to make the kind of pan pizzas that places like Jim Lahey's Sullivan Street Bakery specialize in.  In fact, combining the Roberta's method with aspects of Lahey's method results in some truly outstanding pan pizzas.  And there are a number of advantages to this approach for the novice:

1.  you don't need a pizza stone
2.  you don't need a pizza peel
3.  these pizzas can be easier to form
4.  these pizzas tend to have better staying power

"Staying power"?  Yeah, your classic Neapolitan pizza is best eaten fresh out of the oven.  That doesn't mean it won't be tasty later, either at room temperature, or cold out of the refrigerator, but it's at its absolute peak piping-hot, just moments after having been pulled out of that blistering-hot oven.

Your pan pizza, on the other hand, is often just as good when it's at room temperature--especially if you make the kinds of simple, but smart and delicious pizzas Sullivan Street Bakery became famous for.

This, in turn, opens up further possibilities--like pizza picnics!  Get your hands on those pizza boxes and you suddenly have a dish that's (fairly) easily transportable, that's ready to eat and keeps nicely, and that's a real crowd-pleaser.

In fact, all you need is a bottle of rosé, some olives, and a nice salad, and you've got yourself a complete picnic spread.
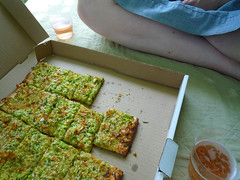
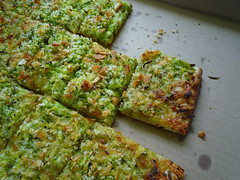
P1040291

P1040292 figs. b & c:  Tony's zuke pie

Then all you have to do is round up some of your pizza-loving friends.  You might even want to dust off your old croquet set as an added lure.  If you've got a backyard with a suitable lawn, and you're a real Eighties Revivalist, you can go for that Heathers look.
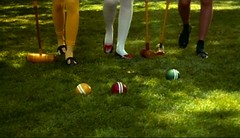
croquet fig. d:  girls gone wild

Then again, if you're more into that Downton Abbey vibe, choose the lushest, most perfectly manicured park you can find.  Preferably one that lies in front of an actual castle.

And if you want to really challenge your guests, select a park that's got some lush and shady sections, for dining and spectating, surrounding a chewed-up ole dogpatch, like we did.  That's when you discover who the true "magicians of the mallet" are.  Already, by our second match, a number of members of our crew were running off brilliant runs of shots, in spite of the difficult terrain.
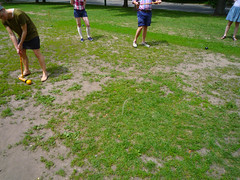
P1040294 fig. e:  diamonds in the rough

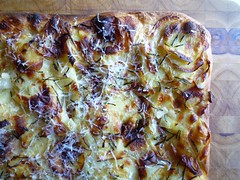
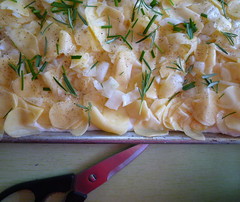
Anyway, I was so excited by the prospect of a pizza picnic that I baked three different kinds the morning of our Pall Mall Pizza Picnic.  The pizza you see above is our latest coup de coeur:  an unorthodox, but fantastically tasty zucchini and Gruyère pie (the Italian original would be made with Fontina instead).  The photos you see below are a couple of before & after shots of the pan pizza that's been a go-to dish for us for the last few months:  pizza patate or potato pie.
P1040287

potato pizza figs. f & g:  potato pizza, before & after

Okay, so what exactly is the Lahey Pan Pizza Method?  Well, it looks like this.
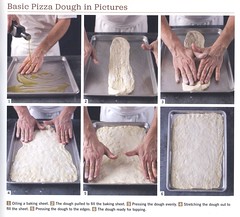
Lahey pizza method fig. h:  Jim Lahey demonstrates

It starts with your pizza dough.  You can use Lahey's own recipe from My Bread, or you can use that Roberta's Pizza Dough Recipe--just make sure to use the full "24-hour" version, featuring 18 to 24 hours of slow fermentation time, if you opt for Roberta's Pizza Dough.

Then you need a 13" x 18" sheet pan and some olive oil.

And, finally, you need to carefully stretch the dough across the sheet pan, forming a rectangular shape.  Check out Lahey's technique in the image above.

With just these elements, you're ready to make a minimalist flatbread.  Just drizzle a little olive oil on top, sprinkle it with sea salt, and bake in a pre-heated 500º F oven.

But these element also form the basics for Lahey's topped pies.

Potato Pizza 
1 qt lukewarm water
4 tsp kosher salt
6 to 8 medium Yukon Gold potatoes, peeled
1 cup yellow onion, diced
freshly ground black pepper
1/3 cup extra-virgin olive oil
Pizza Dough (use 1/2 of Lahey's Basic Pizza Dough recipe from My Bread, or 1/2 of Roberta's Pizza Dough recipe)
fresh rosemary
and/or
fresh chives, chopped 
special equipment:  a mandoline, to make the extra-thin potato slices you need for such a pie 
In a medium bowl, combine the water and the salt, stirring until the salt is dissolved.  Use a mandoline to slice the potatoes very thin (1/16th of an inch thick), and put the slices directly into the salted water.  Let soak in the brine for 1 1/2 hours (or refrigerate and soak for up to 12 hours), until the slices are wilted and no longer crisp.  Doing so will prevent against your potatoes oxidizing, but, more importantly, it will both salt your potatoes and help leach out the water in the potato slices themselves.  This is an essential step, so don't try to cheat on it. 
When your potato slices are ready, reheat your oven to 500º F, with a rack placed in the center. 
Drain the potatoes in a colander and use your hands to press out as much excess water as possible, then pat dry, using a clean dishtowel or some paper towel.  In a medium bowl, toss together the potato slices, onion, pepper, and olive oil. 
Stretch your pizza dough over an oiled 13" x 18" baking sheet as shown in the demo above. 
Spread the potato mixture evenly over the dough, going all the way to the edges of the pan.  Make sure to put a bit more of the topping around the edges of the pie, as the outside tends to cook more quickly.  Sprinkle evenly with the rosemary and/or the chives. 
Bake for 20-25 minutes and check on your pizza.  The topping should be golden brown and the crust should be pulling away from the sides of the baking sheet.  Serve the pizza hot or at room temperature. 
Lahey recommends cutting the pizza into 8 generous slices.  For a picnic, you may want to cut the pizza up into smaller slices. 
Zucchini Pizza 
3 large zucchini, or 6 to 8 medium zucchinis (about 2.5 pounds)
1 1/2 tsp kosher salt
2 cups grated Gruyère
Pizza Dough (use 1/2 of Lahey's Basic Pizza Dough recipe from My Bread, or 1/2 of Roberta's Pizza Dough recipe)
2 to 2 1/2 tbsp homemade bread crumbs 
Use a box grater to grate the zucchini.  In a medium-sized bowl, toss together the zucchini and salt.  Let stand for 15-20 minutes, until the zucchini has wilted and released its water.
Meanwhile, preheat your oven to 500º F, with a rack in the center position. 
Drain the zucchini in a colander, use your hands to squeeze out as much water as possible, then pat dry, using a clean dishtowel or some paper towel.  Salting the zucchini, letting it release its water, draining it, and patting it dry is absolutely essential to the success of this pizza.  Skipping any of these steps will result in a disastrously soggy pizza, so, please, no cheating. 
In a medium bowl, toss together the zucchini and cheese, breaking up any clumps of zucchini, until well mixed. 
Stretch your pizza dough over an oiled 13" x 18" baking sheet as shown in the demo above. 
Spread the zucchini mixture over the dough.  Make sure to put a bit more of the topping around the edges of the pie, as the outside tends to cook more quickly.  Sprinkle the top evenly with bread crumbs.  These give the pizza both color and texture. 
Bake for 20-25 minutes and check on your pizza.  The topping should be golden brown and the crust should be pulling away from the sides of the baking sheet.  Serve the pizza hot or at room temperature. 
Again, Lahey recommends cutting the pizza into 8 generous slices.  For a picnic, you may want to cut the pizza up into smaller slices.
[both recipes are closely based on recipes that appear in Jim Lahey's My Bread]

The third pizza I made was a mushroom pie, with a combination of standard white mushrooms and some sautéed shiitakes, but I didn't take any photographs, so you're going to have figure that one out for yourself.

The bottom line is that this pan pizza method is easy to master and it turns out some great pies.  It also results in a type of pizza that makes possible the pizza picnic, or a low-stress version of the pizza party. 

Why not just use Jim Lahey's own pizza dough recipe if you're going to use his pan pizza method and recipes?  There's no reason you couldn't--but, if you've already fallen in love with one pizza dough recipe, and it works with this method, why not keep things simple?  In terms of the end result, Lahey's pizza dough recipe involves more flour, more yeast, and less fermentation time, and it turns out a pizza that's delicious but somewhat breadier.  Using Roberta's pizza dough recipe turns out the pizzas you see in the photos above.  It's really up to you.

Either way:  long live the pizza picnic!

aj

Sunday, September 08, 2013

Cape Cod Capers

CC 3 fig. a:  geography

Ah, Cape Cod!  Your sandy features and abundant coastline hold so many opportunities, so many pleasures!  And your lobsters are so disproportionately large (and tasty)!

scan fig. b:  nostalgia

We're already so nostalgic for you.  It's only been a little over a week since we returned, but it feels like decades.

P1030622


fig. c:  dunes


We miss your sand dunes and your foliage,

P1030619 fig. d:  ark

your quaint little towns and villages with their whimsical sense of style,

P1030627 fig. e:  shells

and your abundant beachcombing opportunities.

P1030632 fig. f:  lobstah & chowdah

But most of all we miss your seafood stores and markets.  Places like Hatch'sMac's, the Chatham Fish Pier Market, and George's (motto:  "George's plaice has sole."), with their lobster rolls, their beautiful fresh and smoked fish, their briny, inexpensive Wellfleet oysters, and their luscious littlenecks

P1030630 fig. g:  steamahs

and succulent (and sometimes even sandless!) steamers.  Because of you, we ate plentiful seafood each and every day, and in every possible way:  raw, steamed, grilled, pan-fried, etc.

We knew we'd miss your seafood, so we brought some home with us

IMG_0915 fig. h:  sea food

in those lovely lined bags of yours.  We brought back delicious flounder and smoked bluefish, but we were especially excited to be bringing back clams:

P1030647 fig. i:  littlenecks

both littlenecks

P1030651 fig. j:  steamahs

and steamers.  You see, we had it in mind to make some real clam chowder, so we made sure to pick up the other essentials that are so critical to good, old-fashioned chowder-making:

P1030649 fig. k:  bacon

smoky bacon (from New Hampshire),

P1030650 fig. l:  potatoes

seasonal potatoes (from Quebec), and milk and cream (from Vermont).

You can find clam chowder all up and down the Cape, of course, but it's a little difficult to find one to our liking.  The regional preference is for starchy, even stodgy, clam chowder that's heavy with thickeners, but we prefer ours thinner and lighter, with any and all starchiness coming strictly from the potatoes and any crackers or pilot biscuits you might choose to top it off with.  The trick is to chop up your potatoes "thick/thin":  in irregular shapes that are narrower at one end and that cook irregularly.  If you chop 'em and cook 'em just right, the potatoes themselves will thicken your chowder just so.

Clam Chowder 
36 littleneck clams*
125 ml high-quality clam juice [like Bar Harbor] (optional)
4 strips smoky bacon
1 sweet onion, finely chopped
water or high-quality clam juice
9-10 small-medium potatoes, cut thick-thin
1 1/2 cups whole milk
1/2 cup cooking cream
salt and freshly ground black pepper to taste
common crackers (optional, but highly recommended) 
If you want a particularly rich clam broth, pour 250 ml of clam juice in a large pot, add the clams, cover the pot, and bring to a boil.  When the liquid comes to a boil, lower the heat, and steam the clams until they've all opened (about 6-10 minutes). 
If you don't have access to a high-quality clam juice, just use the same amount of water instead, and follow the directions above. 
When the clams have opened, use tongs to place them in a bowl.  And when the clams have cooled enough to handle, remove the clam meat from its shell and chop finely. 
Strain the liquid in the pot along with any broth in the bowl through a fine strainer lined with a paper coffee filter, or just pour it off carefully, leaving the grit behind. 
Fry the bacon in a pan until crispy.  Pour the bacon fat into a pot and sauté the onion until translucent.  Meanwhile, dice the bacon.   
Measure the amount of broth and top off with water or clam juice to make a generous 2 cups.  Add this to the pot with the onion, as well as the diced bacon.  Add the potatoes, bring to a simmer, and cook until they are still firm but done.  Stir the milk and cream into the broth and add salt and pepper as necessary.  If your clams are fresh and briny and if you've used clam juice, you shouldn't need much, if any, salt. 
Bring the broth back to a gentle simmer and add the clam meat.  Do not let the chowder boil.  Cook the chowder at the barest simmer for another 2-3 minutes. 
The chowder will be at its best if you age it briefly, keeping it warm, but not hot, for an hour or so.  Afterwards, just bring the chowder bring it back to temperature, adjust the seasoning, and serve, preferably with common crackers (especially common crackers that have been split and toasted in the oven.) 
Serves 4-6 as an opening course. 
[recipe based closely on a recipe from John Thorne's Serious Pig
* You can also make a nice clam chowder with steamers, but we saved our steamers for, well..., steaming.
The other revelation of our Cape Cod excursion had to do not with fruits de mer, but with fruits du bord de la mer.

Michelle had read about Cape Cod's legendary beach plums years ago.  When we we got an invitation to vacation there, she tried to find out some more about them and discovered that we'd be there at the height of their season--mid- to late-August.  The thing is, how do you go about finding a fruit that's totally wild and that you can only procure from foragers?  Especially when the foragers in question are known to keep their sources secret--like mushroom hunters and their troves of prized chanterelles and morels.

We had no idea how we'd find beach plums, but we were determined to keep our eyes peeled for them.  And, in the end, it took us less than 24 hours to score both beach plums and another wild coastal fruit we had no idea even existed:  wild apricots.  But we found in them in a most unlikely spot:  at a flea market (!).

We'd been told that the weekend flea market at the Wellfleet Drive-In was a must--and it was!--but we had no idea that there'd be a grizzled old hippie selling foraged fruit along with his carved wood C.R.A.P.**  God bless him!  He had an amazing array of carved driftwood whales and other folk art treasures, and his beach plums and wild apricots were beautiful (much, much smaller than we would have imagined, but beautiful nonetheless).

IMG_0902


fig. m:  wild beach plums & apricots

When we got them back to our beach house,

P1030612


fig. n:  sorting


Michelle set about sorting through them.  And the next morning she made an exceedingly precious

P1030653 fig. o:  preserves

small batch of wild apricot and beach plum preserves.  Fresh, both fruit were a little too tart to be pleasant--but sweetened and cooked, they turned into the deepest, most delicious preserves.  The beach plums almost had a wine flavour to them, while the apricots were redolent of almond.

We brought back numerous souvenirs from our trip to Cape Cod,

P1030644 fig. p:  souvenirs

P1030646 fig. q:  ole no. 69

but there's no question the most highly prized were those two jars of beach house-made preserves.

Of course, there are other, more conventional ways of scoring traditional Cape Cod preserves, like beach plum.  And some of them are quite excellent, indeed.  Take the Chatham Jam and Jelly Shop,

P1030633 fig. r:  jams & jellies

in (you guessed it!) Chatham, where you can find dozens upon dozens of house-made jam & jellies, including a whole assortment of wild fruit preserves.

We kept the small batch we made at the beach house for ourselves, but we brought back extras to stock our pantry and give to our friends and family.

Ah, Cape Cod!  We miss you so.

aj

** The acronym stands for Cape Recycled Art Project, if memory serves me right.

p.s. TY to R & MA for making this happen--such a great time!

Sunday, February 15, 2009

Black Gold

brussels 1 fig. a: Brussels in December

Late last year, I found myself back in Brussels. This time around I was sans Michelle, I was working long-ish days, and, it being December, the city had a very different feel to it. Gone were the long, largely improvised strolls back and forth across the city in search of little treasures of all sorts--cultural, gastronomic, and otherwise. Gone were the long hours of daylight and the mild temperatures. In July we'd only been in Brussels for two or three days, but it had seemed like a week of adventures. Probably had something to do with the fact that we ate about a week's worth of food.

Anyway, I still made some discoveries on this latest trip to Belgium,

brussels 2 fig. b: discovery 1

art 2 fig. c: discovery 2

brussels 3 fig. d: discovery 3

but the only true culinary coup came on night #2--and it was a good one. In fact, it was one of my best meals of the year.*

From the outside, with a slow shutter speed, it looked something like this.

la bonne humeur fig. e: La Bonne Humeur

The window ("specialité de moules") and that gunnysack behind it said it all: this was a serious mussels establishment. So serious, in fact, that they only serve mussels in season--which is why Michelle and I ate not a single, solitary mussel during our summer vacation.

The place was called La Bonne Humeur, and it was located east of the city center along Chaussée de Louvain. It was a bit of a haul from my hotel in Schaarbeek, and the night I chose to go it was absolutely raw out--cold, drizzling rain, windy--but the combination of the walk and the weather sure worked up an appetite. In spite of the weather, La Bonne Humeur looked cheery and inviting from the outside, and inside it was warm and friendly. Just the name alone ("the good humor") was enough to begin restoring my spirits--the combination of the atmosphere and the heady aromas quite nearly completed the task.

By the time I sat down, there was just about nothing I wanted more than a steaming cauldron of moules and the good people at La Bonne Humeur were happy to oblige. By the kilo. That's right, the standard portion of mussels at La Bonne Humeur is a healthy 2.2 pounds of the plumpest, juiciest Dutch mussels (from Zeeland, naturally) you could possibly imagine. I loved the way they served them too: heaped in a heavy, enameled cast-iron cauldron (in other words, as they should be), with plenty of celery and fennel, and plenty of broth. Their frites were good, too. Not quite Frites Flagey-good, but fresh, crisp, and piping hot, and served with a tangy homemade mayonnaise. With a cold beer and The New Yorker's Food Issue at my side, this was pretty much my ideal businessman's dinner.

So I came back to Montreal raving. But the thing is, I could sense reluctance on Michelle's part. I kept saying how much I wanted to try and replicate my feast at La Bonne Humeur, and she kept saying, "uh, huh." So I pressed her on the matter and it turned out she liked mussels, but she'd never had a plate of mussels that she'd ever loved. "Never?," I asked. "Never."

Well, those days are gone. When I finally got Michelle to agree to let me make my La Bonne Humeur special for her with the plumpest, juiciest P.E.I. mussels I could find, she changed her tune. Now I have carte blanche to make them whenever I want. And the thing about mussels is: they're so affordable. When was the last time you bought over 4 pounds of Grade A seafood and the cost came in under $10? Thought so.

Now, I don't have La Bonne Humeur's actual recipe, but with the help of a few friends, like Richard Olney and Julia Child, I was able to get close.

black gold fig. f: mussels soaking in brine

Moules à La Bonne Humeur

4-4 1/2 lbs fresh mussels, scrubbed, then soaked in salt water for 15 to 20 minutes prior to cooking
1/2 cup minced shallots, green onions, or finely minced onions
4 stalks celery, 2 cut into 3-4" lengths, 2 finely chopped
1/2 bulb fennel, thinly sliced
1 leek, cleaned, and finely chopped
6 tbsp butter
2 cups dry white wine
generous handful of parsley, chopped or whole
1 bay leaf
1/4-1/2 tsp fresh thyme
freshly ground black pepper

As noted (and pictured) above, make sure to soak the mussels in briny salt water for 15-20 minutes prior to cooking.

Meanwhile, in a large pot or, preferably, a large enameled cast-iron cauldron, heat one tablespoon of the butter over medium heat. Add the shallots (or onions) and sauté until softened and sweet, 5-10 minutes. Add the finely chopped celery, the fennel, and the leek and sauté for 5 minutes more. Add the wine, the remainder of the butter, the celery lengths, the parsley, the bay leaf, the thyme, and the black pepper, bring the wine to a boil, and reduce for 2-3 minutes.

Add the mussels. Cover tightly and boil over high heat, shaking and tossing the contents (while holding the lid firmly in place) from time to time over a period of 3-5 minutes (and up to 10 minutes). The vast majority of the mussels shells should have opened.

Give the mussels another healthy grind of black pepper and serve heaped in bowls with plenty of the broth ladled over.

We didn't have an enameled chaudron large enough to cook 2 kg of mussels, so we made ours in a large pot. Our largest enameled chaudron was just large enough to serve our big, beautiful batch of mussels, however, so that's exactly what we did.

Serves two.


moules marinière fig. g: moules à La Bonne Humeur

Note: common wisdom says to discard any and all mussels that haven't opened after the required cooking time. However, both Richard Olney and John Bil (formerly of Montreal's Joe Beef, and currently with New York's Flex Mussels) recommend using good old-fashioned common sense. Open the culprit with a knife, take a good look. If it looks fine and smells fine, it probably is fine. In fact, Olney insists that the ones that need to be forced open with a knife (after adequate cooking time, of course) "are often the best."


"What about the frites," you say? Well, we didn't make actual Belgian-style frites, but we used our current #1 roasted potato recipe and came up with a substitute that was perfectly acceptable and downright delicious. The recipe goes something like this...

Zuni Café Roasted Potatoes

1 1/2 pounds yellow-fleshed potatoes, peeled or not, cut into irregular 1- to 1 1/2-inch chunks
salt
1/4 cup extra-virgin olive oil

Preheat the oven to 400º F.

Place the potatoes in a 4-quart saucepan and add cold water to cover by a few inches. Salt the water liberally, stir to dissolve, and taste--it should be well seasoned. (Judy Rodgers recommends "a scant 1 1/2 teaspoons sea salt per quart water.") Bring to a simmer over high heat and stir again, then reduce the heat so that it just holds the simmer. Cook until the potatoes are soft on the edges and tender inside, about 6-12 minutes, depending on the potato and the size of your chunks (generally, 10 minutes is ideal for us). Drain well. Taste. The potatoes should be perfectly seasoned and tasty already. Place in a bowl while still warm.

Add the olive oil and toss to coat. Don't worry if some of the slightly overcooked potatoes crumble a bit. Those bits will end up becoming heavily coveted crunchy bits when the roasting is done.

Transfer the potatoes and their oil (and any potato bits) to a roasting pan that is both wide and shallow. Roast until golden, rotating the pan and stirring the potatoes as needed so that they color evenly. Judy Rodgers recommends 20-25 minutes, but we've found that to get the potatoes to the state of perfection, it takes a good 45-60 minutes.

Once the potatoes are perfectly golden-brown and crispy, they'll hold well (according to Judy Rodgers, they may even improve) at 275º F, making this recipe ideal as a roasted potato recipe for dinner parties and large groups.

We found that they were also pretty choice with our moules, especially with mayonnaise (preferably homemade) mixed with a dollop of strong mustard.

Serves 4 as a side.

[based very closely on Judy Rodgers' Rosemary-Roasted Potatoes (her original throws "bruised" rosemary leaves into the mix) from The Zuni Cafe Cookbook]


Serve the two recipes above with a nice green salad and a fine beer or crisp white wine. Even non-believers will see the light. Even the ill-humored will suddenly discover good humor.

Or, when in Brussels:
La Bonne Humeur, 244 Chaussée de Louvain, 1000 Brussels

aj

ps--many thanks to Clotilde for the tip.

* Sorry, Michelle.

Sunday, October 30, 2005

pommes/pommes de terre


heirloom apples
Originally uploaded by michelle1975.


As indicated in our last post, and as confirmed by the photo above, our apple kick definitely isn't over. Hell, we're even contemplating going back to Franklin for Round 2.

Anyway, today we had a conversation with Adam about why we got in this food blog racket in the first place. We're just about to hit our first anniversary, so this is something we've been giving some thought to over the last little while, and something I'm sure we'll be writing about when we hit that milestone. What I can tell you at present, though, is that there've been a number of surprises (pleasant ones) that have fallen into our laps over the last 12 months because of "...an endless banquet," and our friend Adam's visit today was representative of just how pleasant these surprises can be. We knew Adam was heading down to New York and possibly even New Hampshire to do some research on a book he's been working on on the topic of fruit, and we knew he was planning on hitting a couple of very interesting sounding apple orchards. We'd even put in a request for a few prime specimens, but we had no idea if he'd actually be able to come back with anything, and what he'd be able to come back with if he managed to bring anything back. Needless to say, we were pretty excited when we got a phone call from Adam announcing that he'd come back to Montreal with treats for us, excited to see just what he had in store for us. You see, Adam had an appointment to visit the U.S. germplasm repository for apples in Geneva, NY. This wasn't just any old orchard, it wasn't even a first-rate orchard like Red Jacket (also in Geneva), this was a "living museum" of the apple, an apple "library," a collection of apple trees that numbered 5,000 and that encompassed some 2,500 varieties. The germplasm depository had been created in the mid-19th century as a kind of Noachian attempt to preserve and document the 1,800-odd varieties of apple available in the U.S. at the time, as well as to ensure the future development of apple varieties. It's an endeavor that appears to have succeeded. Adam biked over this afternoon, we sat down at our kitchen table, and he told us about his tour of the repository and everything he'd seen. Then he gave us the assortment of apples, mostly heirlooms, that he'd brought back for us: two court-pendus, a rare French variety, a russett-golden delicious hybrid, a Cox's orange pippin, a Monroe, a big, firm variety developed in the more recent past, a jonah gold, and--get this--an Esopus Spitzenberg, another rare variety native to the U.S. that dates back to at least the early 19th century. As I'm sure you've been able to tell over the last few weeks, dear readers, we love our apples. Few things make us happier than an assortment of rare apples, especially when they're as beautiful as these ones. We've been warned that most of them might not necessarily be the best eating apples, but there's also a magic to just coming across strange types of apple you never would have imagined existed (like the court-pendus).

Similarly, a week ago we got a completely unexpected visit from our friend Patrice Fortier, the gardener/farmer who runs the wondrous La Société des Plantes in Kamouraska. We knew he was in town, because he'd emailed me to let me know he was going to be around and that he was going to try to stage one of his informal vegetable & herb street sales, but then we didn't hear back from him. The last thing we were expecting was that he would show up at our doorstep, bearing freshly dug up heirloom fingerling potatoes no less.


fingerling potatoes
Originally uploaded by michelle1975.


It was a Friday evening and I was just getting home from work. We sat in the dining room, had a beer and some Haldiram's All In One, caught up, talked about life at La Société des Plantes, picked out our potatoes, traded some pear-vanilla-bourbon butter for some of Patrice's delicious persillade, a pesto made with parsley, garlic, and sunflower seeds, and generally got the weekend started right. After a couple of hours, Patrice headed out the door to meet up with another friend, and we rolled up our sleeves and prepared our dinner. We turned up the music and found ourselves in the best mood. It's hard enough to get fingerling potatoes in Montreal (although there are signs that that situation is improving). Getting them delivered to your door and turning their delivery into an excuse for an impromptu Happy Hour is beyond ideal. Patrice is due back in town in the next week or so, and he's promised to come laden with white carrots, white beets, Brussels sprouts, potatoes, herbs, and other specialties. If he organizes a street sale, we'll be sure to let you know.

Like I said, these little surprises aren't the reason we started "...an endless banquet," but they're certainly one of the reasons we've enjoyed working on "...an endless banquet" over the last year and are looking forward to year 2.

aj