Showing posts with label New York Times. Show all posts

Monday, August 18, 2014

French Connection

While we're still on the topic of Provence and its cuisine...

So, as expected, this summer food magazines were filled with all kinds of tempting recipes for the 2014 barbecue season.  The July issue of Bon Appétit alone contained a full spread on DIY Korean barbecue; an Austin, TX spread featuring an outrageous-looking citrus-brined pork loin and a grilled rib eye recipe; a Middle Eastern/North African spread featuring mint and cumin-spiced lamb chops and Moroccan chicken brochettes; an article on cold smoking; and a guide to making and grilling your own sausages.  Just that single issue was enough to keep someone busy over their barbecue for months--and, trust me, it did.

But the recipe that turned out to be the single biggest revelation of the summer here at AEB--at least when it comes to the thrill of the grill--was a lonely little number accompanying a book review in the June/July 2014 edition of "Fare," the front section of Saveur.
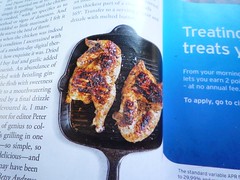
Untitled fig. a:  in print

The book in question was a compendium of more than a century's worth of writing on grilling and grilled foods culled from the pages of The New York Times by Peter Kaminsky.  The Times has been on fire* with their food journalism of late, with a bolder, multimedia-savvy approach that's smart, informative, au courant, and well-designed, and this tome sounds like another play to further establish position within the lucrative food & wine media market.  It's called The Essential New York Times Grilling Cookbook, and it's as much of a legacy-builder as it is a collection of hits from the Times' recent generation of superstar food writers--it's clearly meant to prove that the Times has been writing about food with insight and passion all along, decades before the advent of modern-day foodie-ism.

Anyway, Betsy Andrews' review only features one recipe, but it was one that definitely caught my attention.  The recipe was for poulet grillé au gingembre--grilled chicken with ginger--it was co-authored by those old masters of the Times' '60s, '70s, and '80s heyday, Craig Claiborne and Pierre Franey, and it first appeared in the May 25, 1980 edition.

Andrews was effusive in her praise, but what really caught my eye was that French connection to ginger.  Though it's had a presence in European cuisine since at least the days of the Roman Empire, ginger is a rarity in French cuisine.  Waverley Root, in spite of his name,** is utterly silent on the subject in his magisterial The Food of France.  Ginger is entirely absent from Richard Olney's Simple French Food and his The French Menu Cookbook.  And the rhizome appears only once in Julia Child's two-volume Mastering the Art of French Cooking, and then only in a beef recipe that already contains gingerbread as an ingredient.

The only place I'd actually ever noticed ginger in a French cookbook before was in yet another Richard Olney book:  A Provençal Table:  The Exuberant Food and Wine from the Domaine Tempier Vineyard, a.k.a, Lulu's Provençal Table.  There, Olney doesn't make a fuss about it at all, but the recipe in question always intrigued me because it just seemed so unlikely:  "Poulet Rôti au Gingembre, Coudes au Jus" (Roast Chicken with Ginger, Macaroni with Roasting Juices).  "Macaroni & chicken?"  I'd never ever tried it, but it has been near the top of my "to make" list for a long time.  When I spied Claiborne and Franey's recipe my decision was made:  there was no doubt about it, I was finally going to test this Provençal chicken & ginger combo.  I still wasn't sure about its origins (North African?  North African by way of Italy?  Was Lulu's preparation some kind of clue?), but its apparition in Andrews' book review was clearly a sign.

Plus, the recipe is dead simple.  Mysteriously so.  As Andrews puts it, "It worried me at first:  It called simply for grilling 'until the chicken is cooked,' with no specifics as to method or signs of doneness.  And it yielded so little marinade I felt it might starve the bird of flavor."  But, according to her, the results were a classic example of one of those recipes that defies logic, one of those recipes whose process is almost alchemical:  "[When] the chicken was indeed done (a condition I ascertained with the use of a modern-day digital thermometer), how exquisite it was.  Dried thyme and bay leaf and garlic added aromatic flourish.  An abundance of lemon mingled with bristling ginger to stroke the flesh with sweetness and tenderize it to a mouthwatering moistness, abetted by a final drizzle of butter" (!).

And you know what?  I couldn't have agreed more.  I, too, had the feeling that the recipe couldn't possibly work as I prepared it.  And I, too, experienced something magical instead when I cooked the chicken.  The final product looked great, but it tasted a hundred times better--it had a perfect skin, and was literally bursting with flavour.  The ginger was subtle, but present.  And that final blast of butter...  I couldn't believe what I was tasting, and neither could Michelle.

Untitled 
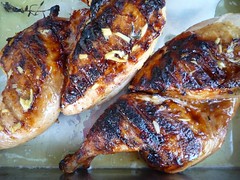
fig. b:  in real life

Without any further ado...
Poulet grillé au gingembre 
1 2.5-3-lb organic chicken, halved, backbone removed
kosher salt and freshly ground black pepper, to taste
1/4 cup fresh lemon juice
2 tbsp olive oil
1/2 tsp dried thyme, or 1 sprig fresh thyme (with fresh thyme in our garden right now, this has been my preference)
1 bay leaf, crumbled
1 clove garlic, minced
1 1-inch piece ginger, peeled and minced
3 tbsp unsalted butter, melted 
Season the chicken generously with salt and pepper.  Stir lemon juice, oil, thyme, bay leaf, garlic, and ginger in a bowl.  Add chicken and toss to coat.  Cover with plastic wrap and chill for 2-4 hours. 
Heat a charcoal grill, making sure that your charcoals are evenly spread and of an even height.  Ideally, you want a fire that's medium-hot.  Be patient.  Grill a bunch of vegetables first, if you have to. 
Grill chicken, turning as needed, until slightly charred and cooked through, about 35 minutes, or until an instant-read thermometer inserted into the thickest part of a thigh reads 165º F.  Transfer to a serving platter and drizzle with melted butter.  Tent the chicken with aluminum foil and allow to rest for 10 minutes.  This will complete the cooking process and allow the chicken to release its delicious juices into your platter.  Serve and devour. 
Serves 2 to 4 people, depending on appetite and number of side dishes. 
[based very closely on a recipe that co-authored by Craig Claiborne and Pierre Franey for The New York Times and then adapted slightly by Betsy Andrews for Saveur]
I still haven't tried Lulu's chicken, ginger, and elbow macaroni recipe yet, but I will.  Believe me, I will.  And I haven't fully figured out that French connection to ginger yet, but I like it--I really, really like it. In fact, there have been times recently when I've declared it the very best grilled chicken I've ever tasted.

aj

* Sorry.

**Apologies, once again.

Friday, June 06, 2014

DIY Pies

Summer isn't even here yet, but already the summer of 2014 is shaping up to be the Summer of the Pizza.  You see, a few weeks ago I experienced something of a pizza epiphany (the trigger appeared in The New York Times, so I'm pretty sure I wasn't alone), and since then I've been on a tear.

Tony's Pizza! fig. a:  Tony's Pizza!

I'd been messing around with pizza recipes for a few years, and I'd experienced a fair degree of success, but I'd never quite hit on a recipe that felt like The One.  Most of the time I was working with variations on Chad Robertson's pizza basics from Tartine Bread.  I've been baking bread quite seriously for a few years now, and my method is very closely based on Robertson's method, so it made sense to follow his lead when it came to pizza, too.  If you follow the instructions in Tartine Bread, the pizza that results is a sourdough-based pie that's a bit on the rustic side for three reasons:  1) because you're essentially pinching dough from your country bread recipe, which contains 10% whole wheat flour, 90% all-purpose flour, and no 00 flour; 2) because your sourdough starter also contains whole wheat flour; and 3) because Robertson recommends dusting your pizza peel with corn meal to help with the transfer of the pizza to your stone. I like "rustic," and Robertson's method results in pizzas that have nice shape and great rise to them, but, still, even though I played around with the formula, it never felt like The One.

nyt margherita fig. b:  margherita by Falco & Sifton

Then I came across Sam Sifton's collaboration with Anthony Falco in the digital pages of The New York Times back in April.  Sifton wasn't just looking to create good pizza at home, he was aspiring to greatness.  And in order to crack the code, he turned to Falco, the "official pizza czar" at Roberta's, the pizzeria/restaurant/bar/tiki garden/community radio station that's perhaps the defining enterprise and hangout of the Bushwick scene of the last decade.  Roberta's also happens to produce some truly outstanding pizza pies.  What resulted was a manifesto.  After commenting on the sheer amount of pizza consumed in America, then lamenting the fact that so much of that pizza is so poor, Sifton goes ahead and proclaims the arrival of a New Era of DIY Pizza-Making:

Very little pizza is made at home, from scratch. 
I am here to change that.  I am here to say:  You can make pizza at home.  You can make pizza at home that will be the equal of some of the best pizzas available on the planet.  With a minimal amount of planning and practice, you can get good at it, even if you are a relatively novice cook.  [my emphasis]
That's a bold statement worthy of the bold type, but, the thing is, Sifton is just about right.  You can make pizza at home.  You can even make some mighty fine pizzas that are comparable to some of the best pizzas available on the planet.  The only thing you'll likely be missing out on is the effect of baking a pizza fast in a blistering-hot pizza oven that's running somewhere between 700º - 1000º F, especially a wood-fired pizza oven like Roberta's.  But your pizzas will look awesome and you'll be proud to serve them, and, even more importantly, you'll be blown away by just how great your DIY pies taste.  I mean, even your leftover pizza will look and taste great.

leftover pizza  fig. c:  leftover margherita & sausage pizza lunch

As soon as I tried this Roberta's Pizza Dough recipe, it felt like The One.

The secret to the Roberta's recipe is all in the method.  Aside from the 00 flour, the ingredients are as basic as they get.  Sifton urges his readers to make use of a kitchen scale the way real bakers do.  I fully agree, but I've included the volume for the active dry yeast because the amount called for (2 grams) is very small, and my kitchen scale is not particularly trustworthy when it comes to such tiny amounts.  And although the recipe works with a minimum of 3 hours' rising time, it works like a charm and has a great deal more flavour if you start your dough about 24 hours before you plan to make your pizzas.  I've made a few 3-hour, 6-hour, and 8-hour pizzas using this recipe over the last couple of months, but I always get the very best results when I start 20 to 24 hours in advance.  Plan ahead.  What Sifton calls "a little pizza homework" really pays off.

Another one of the reasons that Sifton and Falco's collaboration is such a success, is that the article comes with an accompanying video that's clear and concise and provides a great sense of what the dough should look and feel like at each stage in the process.  Don't miss out on it!

The only specialized pieces of equipment you need to make great pizzas at home are a pizza/baking stone and a pizza peel, but even these aren't 100% essential, and Sifton & Falco suggest some useful cheats.

Anyway, without any further ado:
Roberta's Pizza Dough 
Total time: 20 minutes, plus at least 3 hours of rising time 
Ingredients: 
153 grams 00 flour
153 grams all-purpose flour
8 grams fine sea salt
2 grams active dry yeast (3/4 teaspoon)
4 grams extra-virgin olive oil 
Preparation: 
1.  In a large mixing bowl, combine flours and salt. 
2.  In a small mixing bowl, stir together 200 grams lukewarm tap water, the yeast and the olive oil, then pour it into flour mixture. Knead with your hands until well combined, approximately 3 minutes, then let the mixture rest for 15 minutes. 
3.  Knead rested dough for 3 minutes. Cut into 2 equal pieces and shape each into a ball. Place on a heavily floured surface, cover with dampened cloth, and let rest and rise for 3 to 4 hours at room temperature or for 8 to 24 hours in the refrigerator. (If you refrigerate the dough, remove it 30 to 45 minutes before you begin to shape it for pizza.) 
4. Place your baking stone on the middle rack of your oven and preheat your oven at the very highest setting. 
5.  To make pizza, place each dough ball on a heavily floured surface and use your fingers to stretch it, then your hands to shape it into rounds or squares. Top and bake. 
6.  Check your pizza after about 3-4 minutes.  Rotate your pizza if necessary.  Total baking time will be approximately 4 to 8 minutes, depending on the nature of your oven.   
Yield: 2 x 12-inch pizzas 
[recipe based very closely on the recipe that appears in "A Little Pizza Homework" by Sam Sifton, The New York Times, April 8, 2014]
When it comes to topping your DIY pies, Sifton is a proponent of simplicity:
Topping a pizza is tender work as well.  You do not want to overload the pie.  Doing so leaves it soggy, no matter the heat of the oven.  
He's absolutely right, and the recipes that accompany his article are all minimalist gems from the Roberta's repertoire:  their margherita; a two-cheese pizza that cleverly riffs on cacio e pepe, the classic Roman pasta dish (think lots of pepper); and the Green & White, which combines a simple mozzarella pizza with fresh greens.

But after you've mastered these, you'll likely feel emboldened and start thinking about experimenting with toppings a little.  This recipe is very amenable to such experimentation.  Just remember to keep it simple when you do.

When I got started on this pizza craze back in April, I started out as simple as they get--mostly margheritas and marinaras.  But as soon as I felt I had the hang of this recipe (and that was pretty much immediately), I tried out some more adventurous combinations that I'd collected over the years--combinations that I'd either experienced firsthand, or that I'd read about.  Like this radicchio & gremolata pizza

radicchio pie fig. d:  radicchio & gremolata pie

that I also read about in The New York Times a few years back.

Or this potato pizza recipe

Untitled fig. e:  potato pie

from Jim "No-knead/Sullivan Street Bakery" Lahey that's been blowing our minds for years.

Or even this breakfast pizza

sausage & egg pizza fig. f:  sausage & egg breakfast pie

that combined a riff on American Flatbread's classic New Vermont Sausage pizza with an homage to Motorino's breakfast/brunch pizzas.

Feeling lucky?  Here's the recipe for the radicchio pie:
Radicchio & Gremolata Pizza 
1/2 bunch parsley, roughly chopped
1 clove garlic, minced
zest of 2 lemons
zest of 1 orange
extra-virgin olive oil
salt & freshly ground black pepper
1 head radicchio, cored, outer leaves discarded, cut into 1/4-inch strips
4 oz mozzarella
1 oz grated Parmesan or aged pecorino 
Mix the parsley, garlic, citrus zests and enough olive oil to make a loose paste.  Add the salt and the black pepper until the flavour is strong and pleasant to the palate.  Let the gremolata sit for at least 30 minutes, or up to two hours. 
Once you've formed your pizza dough, spread half the gremolata on it, before topping it with half the mozzarella and half the Parmesan or pecorino, and, finally, half the radicchio.  This amount of radicchio might look excessive, but, don't worry, it will reduce significantly. 
Bake until the crust is golden and the radicchio is wilted and a bit charred. 
Eat and repeat. 
Yield:  makes enough topping for 2 x 12-inch pizzas.
[based on a recipe that accompanied "The Slow Route to Homemade Pizza" by Oliver Strand, The New York Times, May 18, 2010]
This beautiful pizza may very well have been the winner at a recent pizza party featuring four different types.  It looks amazing and the taste is unbelievable.  The radicchio gets a bit charred and crispy and caramelized on top; then there's a second layer of radicchio that gets sweet and juicy; and, finally,  there's the cheese and the gremolata to bring it all together and really make it sing.  We're talking a serious showstopper here.

Anyway, that Roberta's Pizza Dough recipe is the key.  Especially if you give it the time it needs to ferment properly.  I've never seen a pizza dough that's such a joy to work with.  And the flavour!

Stay tuned for more about potato pizza, and for my sourdough version of Roberta's Pizza Dough (!).

In the meantime:

Long live pizza!

&

Long live the New Era of DIY Pies!!

aj

Tuesday, December 17, 2013

Toasts & Roasts

holiday sp1 fig. a:  holidaze 2013

We hold these truths to be self-evident:

1.  The holiday season is upon us.

2.  Good God, there's nothing like a perfectly seasoned, perfectly rosé slab of roast beef--preferably one that's then sliced extra-thin, and served with horseradish.*

Okay.  Yes, the holidays are here.  And that means it was time for our annual "...an endless banquet" Christmas spectacular.

AEB xmas invite REDACTED fig. b:  all aboard!

But, the thing is, sometimes LIFE confronts you with an unexpected storm, and, suddenly, you have to chart a new course.

That's kind of what happened this year.  Everything's fine now, there's no need to worry, but something came up that forced us to make a last-minute adjustment.  What it meant was that the Christmas spectacular didn't actually take place at our place this year.  Consequently, we toned things down a bit, scaled things back, and got "back to the basics."

The holiday bash that resulted might not have been quite as wide open as it had been in the past, it might not have been quite as extravagant, but it was still pretty spectacular, and it was much more of a collaborative effort--and all the better for it.  For all these things, we owe our undying gratitude to our hostess.  (TY, RD!)  Such a lovely apartment, such a wonderful atmosphere, such a great time!!

AEB xmas 2013 fig. c:  S.S. Shamrock!

Originally, we'd come up with this vague Lake Champlain "holiday steamship" theme.  The "point of departure" was meant to be our apartment.  I guess we ended up docking just a little ways up the coast.  And we exchanged the S.S. Champlain for the S.S. Shamrock.

Did I mention that there was a pretty significant snowstorm the day of the party?  No big deal.  We're Montrealers, we know how to deal with such situations.

Anyway, "back to basics" meant simpler preparations.  It also meant fewer last-minute preparations.  But it was still pretty plentiful.  The spread:

holiday rye fig. d:  rye!

1 spiral-cut, cob-smoked, maple-glazed Vermont ham with mostarda cherries
1 roast beef with horseradish
nordic shrimp salad
smoked trout & smoked sturgeon platter with cream cheese
crudités & herb dip
baked artichoke dip & corn chips
cheese platter (featuring 1 Jasper Hill Moses Sleeper + 1 Shelburne Farms cloth-bound cheddar)
freshly baked Danish rye & corn rye loaves 
Spanish clementines
gingerbread cookies
festive fudge 
AEB rum punch
aged egg nog
holiday fudge fig. e:  fudge!

And, yes, getting back to that point #2:  a perfectly executed roast beef is a thing of beauty.  It also seemed like just the kind of thing that would have been served in the dining room of an elegant steamship back in the day.

We discovered a method for a simple roast beef that we really love--and that's proven to be foolproof--earlier this year in the pages of The New York Times.  The recipe accompanied an article on Louisville's enigmatic Henry Bain sauce.  Though the sauce was designed to be served as a condiment with everything from steaks to game, it's a stone-cold natural with roast beef.  In fact, Sam Sifton claimed that this may be the sauce's "highest use" in his article, so he turned to Tyler Kord, the sandwich master at New York's No. 7 Sub, for a killer roast beef recipe to go along with his recipe for Henry Bain.  And that's exactly what he got.  I liked the recipe for Henry Bain--it was definitely unlike anything I'd ever tasted before, and, it's true, it made for a tasty accompaniment--but I absolutely loved the recipe for that roast beef.

As many of your probably know already, getting perfect results with roast beef can be a little tricky.  Nobody likes a roast that's extremely undercooked, and overcooking a roast is all too easy.  This recipe relies primarily on ambient heat to gently warm the roast all the way to its centre, resulting in that ideal rosy hue, not to mention an extremely savoury crust, optimal juiciness, and some outrageous pan juices.

I've been impressed with Kord's recipe since the first time I tried it, but recently I made an adjustment to it that's even more to my liking:  I added ground caraway seeds to its spicy-garlicky rub, giving it a finish that was very much in tune with the nordic characteristics of our Christmas party spread.
Off-Oven Roast Beef  
1 beef roast, like top, eye or bottom round, approximately 3 lbs
1 tbsp kosher salt
1 tbsp freshly ground black pepper
1/2 tbsp freshly ground caraway seeds
3 cloves garlic, peeled and minced
1 tbsp olive oil
red pepper flakes to taste
prepared horseradish or horseradish cream
Remove the roast from the refrigerator.  
nature fig. f:  raw!
In a small bowl, mix together the salt, pepper, caraway seeds, garlic, olive oil and red pepper flakes to create a paste.  Rub this all over the roast.  
rubbed fig. g:  rubbed!
Place the roast in a cast-iron skillet or roasting pan, fat side up, and allow the roast to come to room temperature, about 1 to 2 hours.
About 15 minutes before you want to begin roasting, preheat your oven to 500º F.
Place the roast in the oven.  Cook, undisturbed, for 5 minutes per pound.  [I tend to go a little over this recommendation:  e.g. 15 minutes for a 2.6-lb roast, and 30 minutes for 5.25-lb roast.]
Turn off the oven.  Do not open the oven door.  Leave roast to continue cooking, completely undisturbed, for two hours.
After the two hours is up, remove the roast from the oven.  Slice as thinly as possible.  
slicin' fig. h:  roasted!
Serve with pan juices and prepared horseradish.  Or use to make whatever your preferred kind of roast beef sandwich is. 
[recipe based very closely on Tyler Kord's Off-Oven Roast Beef recipe, as featured in The New York Times, January 17, 2013] 
Just how good is this roast beef?  Well, the photos above are of the 2 3/4-lb roast we made the day after we made a 5 1/2-lb roast for our party--a 5 1/2-lb roast that completely disappeared (as tasty things often do).  You see, the next day we found ourselves still having major roast beef cravings, so I went out and picked up another roast and we whipped up another batch--this one served with roasted broccoli and a mixed greens salad.  And horseradish, of course.

The point is:  this recipe is a keeper any time of year, but it's great for the holidays.  Great for a party spread. Great for pleasing a crowd.  Great for making sandwiches.

Happy holidaze 2013!  Eat well!  Drink well!  Be well!

aj

*Actually, roast beef's a pretty lovely thing to serve with radishes à la crème, too.  In fact, the two combined would make for a pretty amazing open-faced roast beef sandwich.  Just a thought...


Wednesday, June 01, 2011

On Rhubarb, Rhubarbe, and Rhubarb Socials, or l'Eighties Night meets Kaffeeklatsch

jean-talon rhubarb fig. a: this is now

Wow, the notion of a culinary Eighties Night seems to have really struck a nerve (including our first mention in The New York Times!).

Sadly, I was too busy having a good time with my tablemates and getting regaled by the multi-course spectacle that unfolded that night to concern myself with being a shutterbug. So the photographic documentation is lacking, but the memories are vivid. And one of the clear highlights of the night was Michelle's Rhubarb and White Chocolate Éclair. I'm not enough of a historian of pâtisserie to weigh in on how '80s that combination of rhubarb and white chocolate was, but I can tell you that the very sight of the éclairs made perfect thematic sense, and that their "pretty in pink" color scheme didn't hurt either.

If you're curious as to how Michelle made her éclairs, well, I managed to coax the recipe out of her. (Membership has its privileges.) This way, if you didn't have the opportunity to actually attend l'Eighties Night, you might at least be able to recreate some of the magic at home (with your very own soundtrack!).

Rhubarb éclairs with white chocolate

for the pâte à choux:

160 g water
200 g milk
2 tsp salt
2 tsp sugar
150 g butter
200 g flour
6 eggs

Mix water, milk, salt, sugar and butter together in a medium pot. Bring to a boil, add flour, take off the heat and stir like mad until there are no lumps. Put back on the heat to dry out the mixture a bit, stirring all the while.

Place mixture in a standing mixture with the paddle attachment, mix 1 min on low. Add eggs one at a time, making sure the mixture is homogenous before adding another.

Place the mixture in a piping bag fitted with a round or star tip. Pipe strips of dough about ½ inch wide and 3 inches long on a baking sheet lined with paper. Brush dough with a bit of egg wash (1 egg, dash of milk, pinch of salt). Bake at 400º F for 8 minutes, then 375º F for 12 min. Make a small hole with a knife in each and let cool.

for the rhubarb compote:

500 g rhubarb, cut into small dice
150 g sugar
125 ml syrup

3 g NH pectin
3 g sugar

Mix rhubarb with sugar and let macerate for 1 hour. Cook briefly until the rhubarb is tender, strain, reserving the syrup. For every 125ml of syrup add 3 NH pectin and 3 sugar, boil a few minutes. Pour over the rhubarb and let cool in the fridge.

for the white chocolate ganache:    

300 g cream
480 g white chocolate
430 g yogurt
2 gelatin sheets

Soften gelatin sheets in cold water. Bring the cream to a boil, add gelatin, pour over the chocolate, let stand 1 min. Whisk the chocolate mixture gently until emulsified. Add the yogurt and mix until homogenous. Let cool in fridge.

to finish:

Cut the éclairs in half lengthwise. Dip the tops in a white chocolate ganache. Pipe one layer of white chocolate cream inside the bottom half. Add a layer of rhubarb compote. Finish with the dipped top half and serve.

All of which brings me to Part 2...

You see, the other reason I chose to focus on this particular recipe is because it's the perfect lead-in to the next Kaffeeklatsch event: Kaffeeklatsch presents Rhubarb Social.

You got it, Kaffeeklatsch is back (version 3.0), and this time the theme is "Rhubarb." This means two things:

First of all, this time around, Michelle will be collaborating with her good friend Stéphanie Labelle, chef-pâtissière of the justly lauded Pâtisserie Rhubarbe.

And secondly, while the menu will feature some of your favorites from Kaffeeklatsch #1 and #2 (apple strudel! sachertorte!), it will also feature a selection of rhubarb desserts by Stéphanie (rhubarb tart! rhubarb religieuse!), featuring the loveliest pink Quebec rhubarb available.

And, yes, once again, coffees will be provided by our good, good friends at Myriade (yes!), who were all too happy to take up the challenge of a coffee that pairs well with rhubarb.

rhubarb fig. b: that was then

Kaffeeklatsch presents Rhubarb Social

Sunday, June 5, 2011
1:00 pm - 5:00 pm
Restaurant Laloux
250 ave des pins est
$12 = pastry, petit four, & coffee

for more information: 287-9127

See you on Sunday!

aj